
Personalized underground bunkers became popular during the Cold War when the threat of nuclear war was imminent. Luckily for all of us, nuclear armageddon didn’t come to pass.
However, the current pandemic has seen a rise in the interest of underground shelters.
Although you can buy a premade underground bunker, they’re expensive and may not meet all of your needs. If you want to protect yourself and your loved ones from a disaster, follow these steps to build an underground bunker, or jump to the full infographic version down below.
1. Get Permission

The most important thing to do is to get the proper permits. Permits are used to ensure safety for you and everyone around you during the project. Failure to obtain or comply with a permit can be expensive and sometimes dangerous if you aren’t careful.
You don’t want to start digging and building an underground bunker only to be stopped and forced to pay a hefty fine. In some cases, you’ll be forced to remove or undo any project you set out to do.
To obtain the appropriate permits, you need to go to your local building department or building official. You will need to show them plans of what you are going to be doing, so make sure you have your blueprint (more on that later) and a map showing where you’re going to be working.
Permits can vary depending on where you live; for example, if you’re building your bunker in San Diego, CA, the types of permits you’ll need are:
- Grading Permit: Grading is required when a project may alter the topography of a property due to excavations or fillings. A preliminary evaluation is needed to make sure you aren’t building on environmentally sensitive lands and to assess the feasibility of the project you’re conducting.
- Building Permit: This is to ensure the construction project complies with local, state and federal law.
- Discretionary Permit: When a project has the possibility of impacting the surrounding area due to the proposed use, location or design feature, a discretionary permit is needed.
- Plumbing Permit: If you’re adding plumbing for your underground bunker (more on that later), a plumbing permit is necessary.
- Electrical Permit: If you’re going to install any electrical wiring or equipment, you’ll need an electrical permit to make sure everything is wired safely and correctly.
No matter where you’re located, however, you need to call 811 before you dig so that you don’t accidentally break an underground utility line. Doing so can be costly and dangerous to your health. It’ll take a few days, but a locater can identify the placement of any underground utility.
2. Choose the Location

Once you have your permits in place, the next thing you need to do is to consider your bunker location. It needs to be someplace you’ll be safe and private if secrecy is an essential factor.
Avoid any place that is close to large bodies of water as they’re more likely to flood, which can damage the structural integrity of your bunker. Likewise, avoid any flammable place.
Try to avoid digging in a place that is surrounded by trees and vegetation. Trenching near trees means that you’ll be dealing with a complicated web of roots that’ll be difficult to cut through. Not only that but cutting through these roots can be detrimental to the local geography.
Likewise, you need to avoid digging into any utility lines. If you called 811, you’d already know exactly where the utilities are located. Avoid digging on top or with 18-24″ on all sides of the utility line. If you can’t avoid them, then you may need to reconsider where exactly you build your bunker.
3. Develop a Blueprint
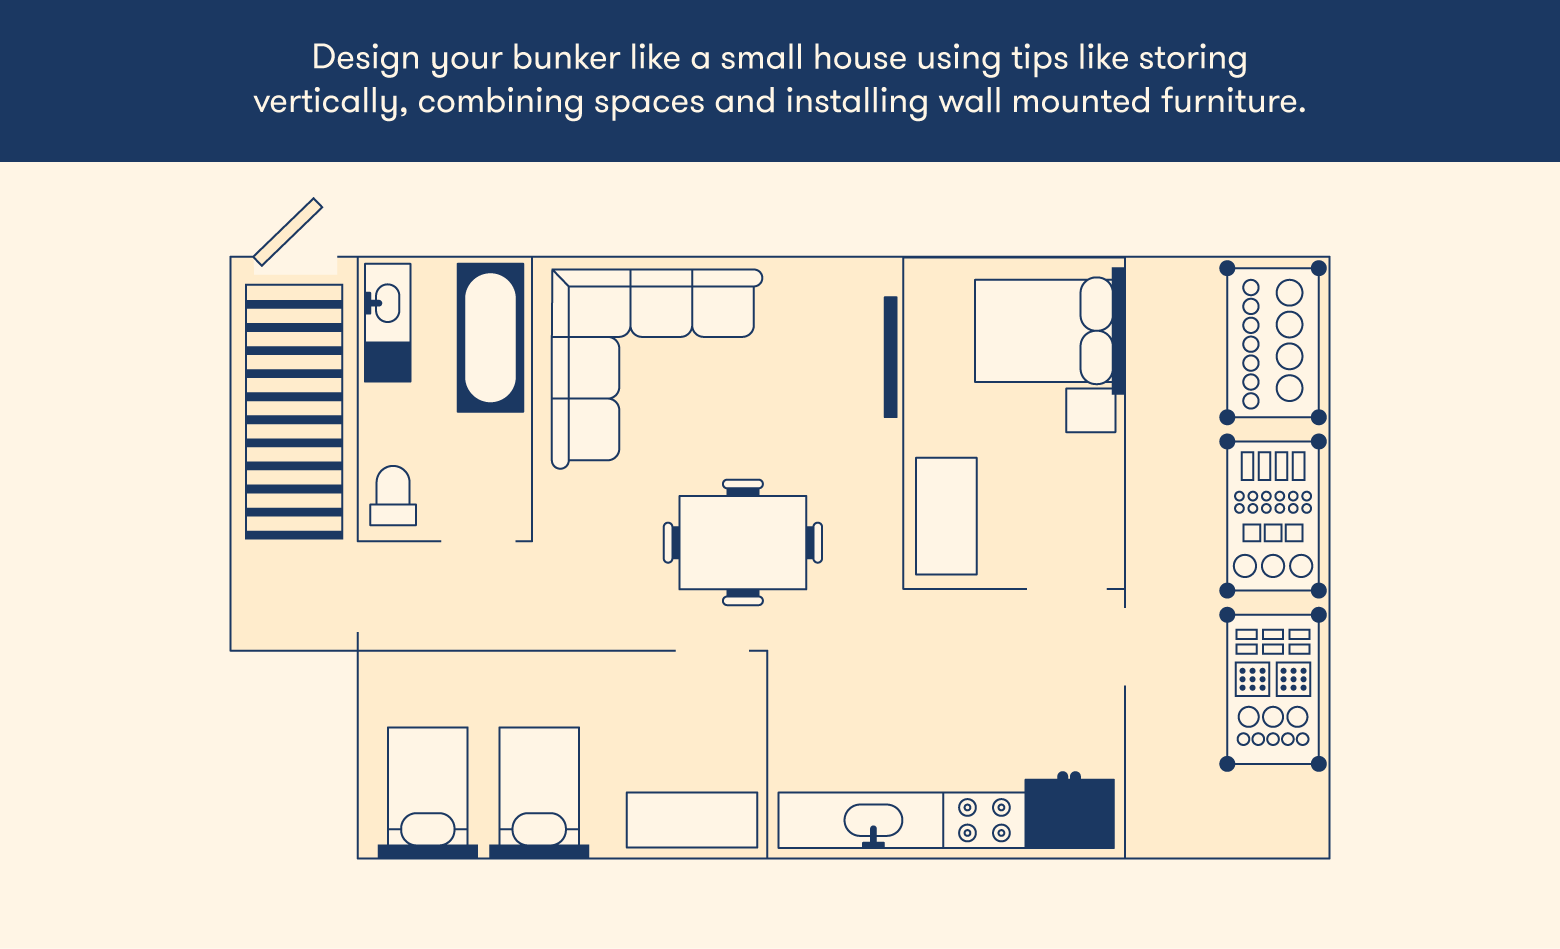
Just like when you’re building a house, you first should develop a blueprint of your underground bunker. However, unlike a home, you’re not building for luxury, but rather for safety and security.
After you’ve picked where you want to build your bunker, measure the area you have to work with (away from the utility lines, trees and bodies of water). From there, you’ll get a sense of how you can design your blueprint.
There’s not going to be a lot of space, but that doesn’t mean you can’t make it work. You want to have enough room that you aren’t hugging your knees everywhere, but you don’t want to waste space.
Think of it as a small house and use the same tips to maximize space. For example:
- Combine spaces by using an open area plan
- Utilize vertical space for storage efficiency.
- Install wall-mounted furniture like a desk or table to save on space.
Whatever you decide to do, make sure you plan for both efficiency and comfort. You may be building a bunker for safety, but that doesn’t mean you have to make it feel claustrophobic.
To avoid claustrophobia as much as possible while utilizing the limited amount of room that you have, FEMA recommends between 5-10 square feet per person for tornado or hurricane shelters. With this in mind, try to plan for that much private space per person.
4. Pick the Right Bunker Building Material

Make sure the bunker is made of a strong material that won’t crumble underneath the dirt. Not all building materials are equal, especially when it comes to dealing with building something underground. The most common building materials are:
- Metal Sheeting – Metal sheeting is sturdy and water-resistant, but can also be expensive, especially since insulation would need to be added.
- Bricks – Bricks, are sturdy and relatively affordable building materials that are also great insulators and incredibly weatherproof. They can also add style and color to an otherwise dreary situation.
- Concrete – Reinforced concrete can withstand high loads and is relatively cheap. Self-healing concrete is an advanced building material that reduces maintenance requirements and has about a 200-year lifespan.
Don’t use wood, as it’s incredibly prone to weathering, rot and can become vulnerable to infestation. You can use wood to decorate the inside of your bunker, but make sure you keep it clean.
Shipping container bunkers can be spacious and cost-effective. However, you won’t be able to customize your layout as much. Shipping containers would also need to be reinforced as shipping containers aren’t built to be buried.
When you have your materials for your bunker ready, the next step is to figure out how to dig into the ground.
5. Choose the Right Excavating Equipment

Unless you have all the time in the world, a shovel isn’t sufficient enough for the task at hand. You need excavating equipment that can both dig quickly and in awkward or tight spaces. Since you’re aiming for accuracy and quickness of work when you’re digging, you’re going to want a trencher and an excavator.
There are five main uses for a trencher: cutting pavement, creating drainage, shoveling, digging for utility lines and cutting roots. When digging for your bunker, a trencher can help by outline the area where you want to place your bunker.
Excavators are versatile earthmoving machines that are used for anything from digging a trench to mining operations. Because there are different types of excavators available, you’ll be able to use one to dig out a hole for your bunker effectively.
You’ll start by measuring and setting up a perimeter for the dig. Then use the trencher to outline. After that, you can use an excavator to begin excavating the rest of the hole your bunker will be placed.
An excavator will provide a much more efficient and accurate dig due to their linear motion of digging. A mini excavator can fit in narrow spaces and are better suited for digging holes in awkward areas, such as a backyard.
6. Acquire Key Living Materials

Putting a metal box in the ground and calling it a day isn’t enough. An underground bunker needs to sustain you and your loved ones for an extended time. The five things you want to make sure that you include are:
- Ventilation and Air Filters: These filter and ventilate clean air into your bunker. An N.B.C. (Nuclear, Biological, Chemical) filter is your best bet at protecting your shelter from air contaminants and providing fresh air.
- Generator: This will provide electricity to your bunker. To determine how much power you will need, add up the total wattage of everything that uses electricity. This will give you an understanding of how to choose the best generator for your bunker. Consider installing a solar generator to avoid needing to stockpile fuel, or keep it around as a backup.
- Water Filters: These will keep a reliable source of clean water on hand. Any water filter can work, but for an underground bunker, a UV filter is optimal. They use different frequencies of UV light to rid the water of viruses and bacteria.
- Waste Removal System: Mismanaging waste can be detrimental to one’s health. For an underground bunker, there are a few options you can go with:
- You can keep it simple with a room with a trench, like an outhouse. It’s cheap and quick, but it can be unsanitary.
- A “poop tube” is a quick way to deal with waste, and they’re easy to make, needing only some PVC pipe. They’re not great for long-term use, however.
- A composting toilet needs no water; instead, it transforms waste into fertilizer, which is excellent if you have plants, but they can be a little pricey and smelly in enclosed places.
- A wastewater pump and lift system is a popular option for controlling waste. These systems pump waste from lower to higher elevations.
You’ll also want to stock up on bottled water, personal and non-perishable food. Don’t pinch pennies on any of these; they’re going to protect your shelter and all the inhabitants.
7. Start Digging

When you finally begin to dig, you’ll be utilizing the cut and cover method (similar to how subways are built). In this method, you dig a trench, create a support system (more on that later), place your bunker and cover it back up.
But before you break ground, let’s quickly review the digging safety once again. According to OSHA, digging is one of the most hazardous construction jobs, so make sure you’re practicing trenching safety by installing protective systems to prevent cave-ins. The three most common protective systems are sloping/benching, shoring and installing a trench shield.
- Sloping involves cutting the trench wall at an angle to create a slope, where benching is the act of creating long benches/steps to travel up the wall.
- Shoring is the act of building a support system to keep the dirt in place, preventing a collapse.
- A trench shield, or trench box, protects the person inside from a cave in, rather than used to prevent one. Use this in conjunction with the other two protective systems.
Don’t forget to consider how deep your bunker is going to be. You want to dig deep enough to protect yourself from natural environments, but not too deep so that you risk trapping yourself.
A general rule of thumb is that the top of your bunker should have no more than 10 feet of packed dirt on top. Dry, packed dirt is warmer than loose soil and can protect against radiation and blast waves. However, if for some reason you need to dig yourself out, you won’t have a lot of dirt on top of you.
8. Reinforce the Shelter

Reinforcing your shelter is a crucial step in building an underground bunker. No matter how deep you dig, you’re going to have quite a bit of weight pressing down from the top due to soil, water, vegetation and other outside objects.
Begin by setting up a proper foundation before setting your shelter to support your bunker. Concrete is one of the best materials for a basic foundation but can be prone to cracking and breaking. Use reinforced concrete or self-healing concrete for greater results.
Place metal beams across the trench to support your bunker against collapsing. You can also use reinforced concrete to create an extra outer layer for added protection.
The walls of your bunker also need to be at least 1-3 feet thick. If you’re using metal sheets, make sure to add a layer of brick or concrete inside. If you’re using concrete, make sure that the walls are thick and reinforced to add extra protection against explosive shockwaves and radiation.
Water damage can create mold if untreated and destroy your structures. Coat your bunker and protective systems with waterproof materials, such as rubberized asphalt or cementitious waterproof coating.
If you’re building in an earthquake-prone area, consider utilizing similar reinforced methods as earthquake-proof buildings. Shear walls, cross braces and moment-resisting frames can redistribute the seismic forces, protecting the bunker.
9. Stock up on Provisions

Whether it’s a nuclear fallout or an apocalyptic scenario, you’re going to be spending some time beneath your bunker during the initial event. At the bare minimum, FEMA recommends you should have at least two weeks’ worth of food and water per person.
No matter what happens, you should apply the 7:10 rule of thumb that’s used to estimate radioactive risk. It states that for every 7-fold increase in time after detonation, there is a 10-fold increase in detonation.
Basically, if two hours have passed after detonation, the radiation exposure rate is 400 roentgens (radioactive waves) per hour. After 14 hours, the radioactive exposure rate is 1/10 of that.
Make sure the food is healthy and will last, however. A list of the healthiest, non-perishable foods include:
- Dried/canned beans
- Dried/canned fruits and veggies
- Dried/canned meats
- Peanut butter
- Nuts/seeds
- Grains
- Protein bars
- Canned soup
- Non-dairy and dry milk
Make sure you’re routinely restocking and replacing your foods; you don’t want to eat any spoiled food when an emergency happens.
You should also keep a microwave or other emergency cooking solution like canned heat or a portable butane stove. Candles can also be used as a form of slow cooking and are a trustworthy source of light in case the electricity goes out. Simply put a can or pot on a stove grate and place the candle below.
The water is especially important as radiation can continue to rain down for about 24 hours after detonation. You should also consider stocking up on vitamins and other supplements.
Likewise, your underground shelter doesn’t need to be a cold and gloomy place. It would be best if you did everything you can to prevent any psychological damage from isolation. Cabin fever is a popular term that refers to the negative feelings of isolation. It can cause:
- Restlessness
- Irritability
- Difficulty concentrating
- Lethargy
- Depression
Hang up pictures, install a speaker system to play music or add a workout area to keep yourself busy. Your mental health is just as important as your physical health, so make sure you take care of your mental well-being.
The COVID-19 pandemic has caused many to worry about their safety and well-being. Learning how to build an underground bunker can prepare you for any emergency. All you need now is the right equipment and a gameplan.


